HYCU OBM Management Pack for Citrix provides monitoring for your Citrix environment, but in order to achieve this, you must configure your management pack correctly. In our latest version 3.0, we have introduced a new tool that will help administrators to perform configuration steps even quicker and with more ease.
In this blog we will look at what is needed, how to configure, what are the prerequisites and we will shed some light on a few areas that can be hard to grasp.
Before we get started, I know you are super excited but before we do anything, we must establish our starting point and prepare everything needed for performing the configuration steps. It’s always good to have the HYCU OBM Management Pack for Citrix documentation ready by your side. It’s always a best practice to have instructions near by. You wouldn’t start assembling IKEA furniture without instructions and the same goes for computer software.
Installed and configured OBM
This one is quite obvious.
Installed HYCU OBM MP for Citrix
The installation process is as simple as running the installation script and providing required information so we will skip this part, but for more information you can always look at the User’s Guide.
Added Citrix servers to OBM as managed nodes
Depending on your environment you must add certain computers as monitored nodes (with installed Operations Agents), grant certificates in the OBM and establish communication between them. For this blog we will assume that your environment consists of XenApp & XenDesktop, StoreFront, Provisioning Services and License Server. If you don’t have all of those components installed don’t worry, just skip those steps and if you have more than one StoreFront server just repeat the required steps for all of them.
Servers which should be added as managed nodes in OBM:
- XenApp & XenDesktop delivery controllers
- StoreFront servers
- Provisioning Services servers
- License Server
And
- VDA Machine Monitor
Please note that I won’t be explaining in detail what VDA Machine Monitor is or how it works as this is described in a different blog, so if you think that you don’t quite understand it I suggest that you stop at this point, read the blog post about VDA Machine Monitor and return back when you feel confident enough. Don’t worry we will still be here when you return.
Citrix information and accounts
Now that we have prepared everything on the OBM side let’s continue. Usually one team is administering Citrix and another team is taking care of monitoring. Because of that, OBM administrators usually don’t have information about Citrix accounts and other information which we will need for configuration. That’s why I will list everything needed, so you can go to your Citrix team with a simple checklist and get the required information. But wait there is more. Because it’s holiday season I will share a handy questionnaire you can use. You can get it here.
StoreFront
For monitoring StoreFront stores we will need names of the stores and user accounts that can access them. I recommend that you create a special Citrix monitoring user with access permissions for all such stores. This user is used by HYCU OBM Management Pack to do synthetic transactions on stores and measure different aspects of its responsiveness and availability.
XenApp & XenDesktop
For monitoring XenApp & XenDesktop, sites story is very similar. Again we need names of the sites we are planning to monitor and Citrix site administrator accounts for those sites. The important thing is that the site administrator account must have “Log on as a service” rights on the delivery controllers.
Provisioning services
For monitoring Provisioning Services farm names and farm administrator accounts information is needed.
Computer accounts
In order to achieve the full monitoring experience we will also need to gather some more information about the servers in the Citrix environment. I have intentionally separated this in a new section to match the flow of the configuration tool and is thus easier to follow. Information needed is:
- XenApp & XenDesktop delivery controllers hostnames
- Provisioning Services servers hostnames
- VDIs hostnames
And
- Administrator accounts for all those machines
Note: For all hostnames please specify fully qualified domain names (FQDN).
Now that we have all the information at hand, we can proceed with configuration steps on OBM server.
Configuration Tool
Configuration is performed by running a script on the OBM server and following information on screen. I will demonstrate steps on Linux OBM, but it’s basically the same on Windows. We navigate to HYCU OBM Management Pack for Citrix bin directory (/var/opt/OV/shared/SPI-Share/ctxspi/bin) and run CTX_ConfigTool.pl script. A simple TUI will open up and we enter information we prepared before by selecting appropriate options in the menu.
TUI you say! In 2019? Are you mad? Where is the fancy GUI with 4K background images, animations and shaded buttons, you might ask. Let me explain. Our number one priority at HYCU is simplicity. We can all agree that good software doesn’t need to be hundreds of MB in size, having dependencies to some obscure technologies that will be obsolete the next Friday and degrade performance of your mission critical servers. I can proudly say that our HYCU OBM Management Pack is under 20MB (with documentation included) and still rocking the Citrix monitoring world.
Back to business…
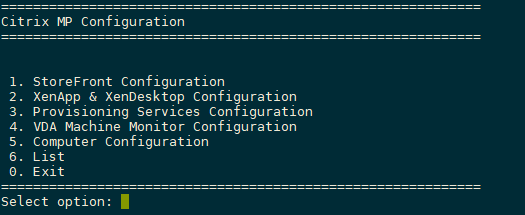
We will start with StoreFront Configuration. Press 1 and Enter to navigate to StoreFront menu.

Citrix MP configuration menu
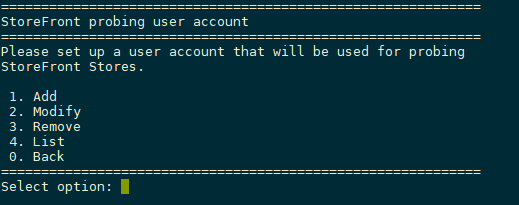
A sub menu will open where you can add, modify, remove or list configuration for Citrix component you have selected. In this case StoreFront.

StoreFront configuration menu
We select option 1 and enter information.

Store information
You will be returned to the previous menu where you can add additional stores, modify existing or delete unwanted entries. But what if I have 50 stores? Do I need to enter each and every one manually? Don’t worry, we’ve got you covered. For the store name you can use a wildcard character * which means that the account info you have entered will be used for all your stores.
Now that we got a hang of using the configuration tool, we can proceed with XenApp & XenDesktop and Provisioning Services. I won’t guide you through these steps as they are very similar to StoreFront but I will focus on VDA Machine Monitor and Computer configuration.
VDA Machine Monitor is (usually a separate) machine which will connect to your Citrix delivery controllers and is responsible for agentless monitoring of your VDIs. To configure it we need to add hostname of the VDA Machine Monitor and list of delivery controllers. Like so:

VDA Machine Monitor information
On to the last step. If you remember from before in the computer configuration section we need to provide hostnames and administrator accounts for delivery controllers, provisioning services servers and VDIs. Because VDIs can be provisioned and deployed on demand we don’t know their hostnames in advance and we certainly don’t want to manually add thousands of entries. Again, we will use the wildcard character * for matching hostnames or perhaps just parts of the hostnames that are changing.

Computer information
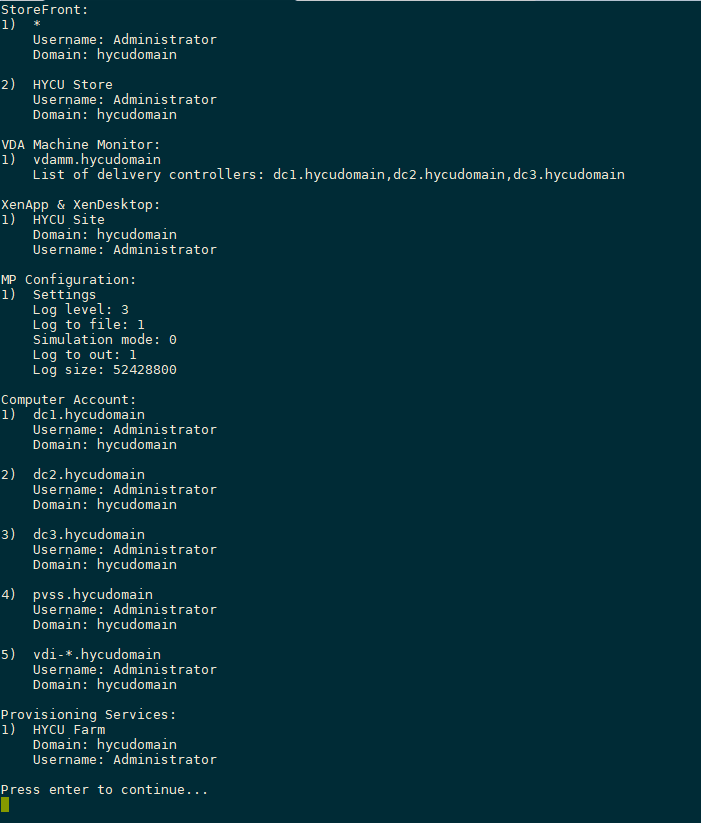
To double check our configuration we will go back to the main menu and select List. Your output should be something like this:

Configuration summary
Our configuration is saved in the in the CTX_Config.json file in conf directory (/var/opt/OV/shared/SPI-Share/ctxspi/conf). If you want to do any changes later on, you just run the configuration tool and perform appropriate steps.
You have successfully configured HYCU OBM Management Pack for Citrix. Great job!
Additional Resources:
Get the newest insights and updates
Configuring HYCU OBM Management Pack for Citrix
HYCU OBM Management Pack for Citrix provides monitoring for your Citrix environment, but in order to achieve this, you must configure your management pack correctly. In our latest version 3.0, we have introduced a new tool that will help administrators to perform configuration steps even quicker and with more ease.
In this blog we will look at what is needed, how to configure, what are the prerequisites and we will shed some light on a few areas that can be hard to grasp.
Before we get started, I know you are super excited but before we do anything, we must establish our starting point and prepare everything needed for performing the configuration steps. It’s always good to have the HYCU OBM Management Pack for Citrix documentation ready by your side. It’s always a best practice to have instructions near by. You wouldn’t start assembling IKEA furniture without instructions and the same goes for computer software.
Installed and configured OBM
This one is quite obvious.
Installed HYCU OBM MP for Citrix
The installation process is as simple as running the installation script and providing required information so we will skip this part, but for more information you can always look at the User’s Guide.
Added Citrix servers to OBM as managed nodes
Depending on your environment you must add certain computers as monitored nodes (with installed Operations Agents), grant certificates in the OBM and establish communication between them. For this blog we will assume that your environment consists of XenApp & XenDesktop, StoreFront, Provisioning Services and License Server. If you don’t have all of those components installed don’t worry, just skip those steps and if you have more than one StoreFront server just repeat the required steps for all of them.
Servers which should be added as managed nodes in OBM:
- XenApp & XenDesktop delivery controllers
- StoreFront servers
- Provisioning Services servers
- License Server
And
- VDA Machine Monitor
Please note that I won’t be explaining in detail what VDA Machine Monitor is or how it works as this is described in a different blog, so if you think that you don’t quite understand it I suggest that you stop at this point, read the blog post about VDA Machine Monitor and return back when you feel confident enough. Don’t worry we will still be here when you return.
Citrix information and accounts
Now that we have prepared everything on the OBM side let’s continue. Usually one team is administering Citrix and another team is taking care of monitoring. Because of that, OBM administrators usually don’t have information about Citrix accounts and other information which we will need for configuration. That’s why I will list everything needed, so you can go to your Citrix team with a simple checklist and get the required information. But wait there is more. Because it’s holiday season I will share a handy questionnaire you can use. You can get it here.
StoreFront
For monitoring StoreFront stores we will need names of the stores and user accounts that can access them. I recommend that you create a special Citrix monitoring user with access permissions for all such stores. This user is used by HYCU OBM Management Pack to do synthetic transactions on stores and measure different aspects of its responsiveness and availability.
XenApp & XenDesktop
For monitoring XenApp & XenDesktop, sites story is very similar. Again we need names of the sites we are planning to monitor and Citrix site administrator accounts for those sites. The important thing is that the site administrator account must have “Log on as a service” rights on the delivery controllers.
Provisioning services
For monitoring Provisioning Services farm names and farm administrator accounts information is needed.
Computer accounts
In order to achieve the full monitoring experience we will also need to gather some more information about the servers in the Citrix environment. I have intentionally separated this in a new section to match the flow of the configuration tool and is thus easier to follow. Information needed is:
- XenApp & XenDesktop delivery controllers hostnames
- Provisioning Services servers hostnames
- VDIs hostnames
And
- Administrator accounts for all those machines
Note: For all hostnames please specify fully qualified domain names (FQDN).
Now that we have all the information at hand, we can proceed with configuration steps on OBM server.
Configuration Tool
Configuration is performed by running a script on the OBM server and following information on screen. I will demonstrate steps on Linux OBM, but it’s basically the same on Windows. We navigate to HYCU OBM Management Pack for Citrix bin directory (/var/opt/OV/shared/SPI-Share/ctxspi/bin) and run CTX_ConfigTool.pl script. A simple TUI will open up and we enter information we prepared before by selecting appropriate options in the menu.
TUI you say! In 2019? Are you mad? Where is the fancy GUI with 4K background images, animations and shaded buttons, you might ask. Let me explain. Our number one priority at HYCU is simplicity. We can all agree that good software doesn’t need to be hundreds of MB in size, having dependencies to some obscure technologies that will be obsolete the next Friday and degrade performance of your mission critical servers. I can proudly say that our HYCU OBM Management Pack is under 20MB (with documentation included) and still rocking the Citrix monitoring world.
Back to business…
We will start with StoreFront Configuration. Press 1 and Enter to navigate to StoreFront menu.

Citrix MP configuration menu
A sub menu will open where you can add, modify, remove or list configuration for Citrix component you have selected. In this case StoreFront.

StoreFront configuration menu
We select option 1 and enter information.

Store information
You will be returned to the previous menu where you can add additional stores, modify existing or delete unwanted entries. But what if I have 50 stores? Do I need to enter each and every one manually? Don’t worry, we’ve got you covered. For the store name you can use a wildcard character * which means that the account info you have entered will be used for all your stores.
Now that we got a hang of using the configuration tool, we can proceed with XenApp & XenDesktop and Provisioning Services. I won’t guide you through these steps as they are very similar to StoreFront but I will focus on VDA Machine Monitor and Computer configuration.
VDA Machine Monitor is (usually a separate) machine which will connect to your Citrix delivery controllers and is responsible for agentless monitoring of your VDIs. To configure it we need to add hostname of the VDA Machine Monitor and list of delivery controllers. Like so:

VDA Machine Monitor information
On to the last step. If you remember from before in the computer configuration section we need to provide hostnames and administrator accounts for delivery controllers, provisioning services servers and VDIs. Because VDIs can be provisioned and deployed on demand we don’t know their hostnames in advance and we certainly don’t want to manually add thousands of entries. Again, we will use the wildcard character * for matching hostnames or perhaps just parts of the hostnames that are changing.

Computer information
To double check our configuration we will go back to the main menu and select List. Your output should be something like this:

Configuration summary
Our configuration is saved in the in the CTX_Config.json file in conf directory (/var/opt/OV/shared/SPI-Share/ctxspi/conf). If you want to do any changes later on, you just run the configuration tool and perform appropriate steps.
You have successfully configured HYCU OBM Management Pack for Citrix. Great job!
Additional Resources:
Experience the #1 SaaS data protection platform
Try HYCU for yourself and become a believer.

